I decided to try my hand at making some homemade wax melts. Except that these aren’t technically wax melts, as there’s no wax involved. But it looks like a wax melt and behaves like one, so a wax melt it shall be named, at least for the purpose of today’s frugal experiment.

I love wax melts, and all of the fun scents. But I recently tried one that irritated me so much that I couldn’t stand to be in the room when it was turned on. So on a whim, I rummaged through my kitchen hunting for things that I could use to make my own natural, homemade version. And finally I settled on these ingredients:

This is truly an experiment at its core. I previously tried a natural version of this before that simply consisted of water and essential oil. And the scent was very, very faint – almost to the point of putting out no scent at all. So this experiment could’ve gone either way.
Coconut oil and essential oil – the blogosphere’s favorite ingredients.
Here’s how I made them.
DIY Homemade Wax Melts
I melted five tablespoons of Coconut Oil in the microwave for about 30 to 45 seconds.

Once the coconut oil was melted, I added 40 drops of lemon essential oil. Then stirred to combine. I was going for a ratio of 8 drops of essential oil per tablespoon of coconut oil (because 10 seemed excessive), but in hindsight, it would have been better to go for a ratio of 10 drops per tablespoon, or even per melt for a stronger scent.

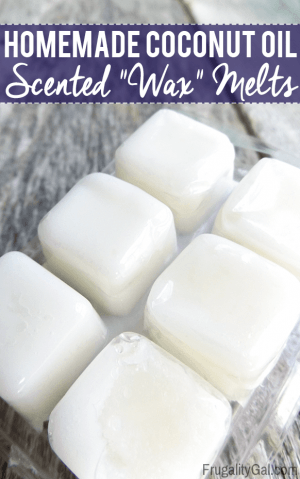
I simply washed and reused the clamshell from one of my old wax melts, so this batch made six melts.
I let them harden before using. My clamshell sprung a leak, so I had to speed up the process by placing mine in the fridge for about 30 minutes.
Because coconut oil is a soft oil even at room temperature, these aren’t as sturdy as a regular wax melt. But they do solidify and take shape, they’re just not as hard as an actual wax melt.
Final Results:
Though a bit faint, this produces a nice gentle scent. Unlike using just essential oil and water, the scent lingered longer and doesn’t evaporate quickly (I can actually pour these back into the clamshell after use). So it is better than the other natural alternative I’ve tried. But I’ll admit, the scent doesn’t waft through the house like a traditional wax melt, which is slightly disappointing.
This is cheaper and more natural than a “real” wax melt… but it can be improved upon. So I’ll likely play around with this a couple of more times to see if there are any tweaks I can try to make the scent of the essential oil more powerful in these homemade wax melts (suggestions are appreciated!).
Why Use Wax Melts?
There are many reasons to use wax melts instead of candles. I used to always have candles burning – I just loved the scents. But when the wax melts hit the stores, I was more than eager to try them out.
While my adventure to make my homemade wax melts have kept me intrigued, I’ve also had time to think about why wax melts are so much better and safer. Take a look at this list of reasons to keep using wax melts.
- There is no flame with wax melts. One of the biggest reasons to limit candle usage is the flame. You don’t have to worry about catching your house on fire when you run to the store and didn’t to blow out the candle. We’ve all been somewhere when we realized that the candle was still burning – and the panic set in! There is no panic with wax melts.
- Saving money is a big deal! I love to save money, that’s what inspired me to make homemade wax melts (as well as the aroma of store-bought ones). Let’s face it, candles are insanely expensive.
- You can use wax melts almost anywhere. It’s not a good idea to burn a candle at your work, but most people are okay with you using wax melts. The smell of the wax is inviting and appealing to most people.
- There is no more soot when you use DIY wax melts. It frustrated me when I would light an amazing smelling candle and then next thing you know the jar is black with soot. It’s not appealing to look at and isn’t very welcoming!
Why Make Homemade Wax Melts?
Making homemade wax melts is a great idea for many reasons. I already mentioned how much some of the commercially made melts give me a headache due to the strong odors. When you buy a prepared wax melt, there is a chance that it has chemicals that might impact people with asthma or those that have sensitivities.
I’m not saying to throw those out, but making your own gives you the control of what is in them. That is something that means a lot to me and my family. Plus, not only can I control what is in them, I can decide what they smell like too.
The variety of aromas you can make is unlimited! You’ll love creating and making all sorts of different wax combinations. It’s like a fun science experiment!
Giving Homemade Wax Melts As Gifts
I love giving out homemade gifts because everyone seems to go wild for them! It just means so much when someone takes the time to make homemade just for you.
If I am making DIY wax melts to give out as gifts, I like to use cute molds instead of leftover wax containers. You can choose anything like flowers, hearts, or even simple squares. There is no wrong answer here. Check out the candy mold aisle in Michaels or shop online.
Place the wax melts in a mason jar and put a lid on it. I like to tie a ribbon or colored raffia around the jar. When you give them out you will see a ton of smiles!
Essential Oils Combinations
If you want to have amazing smelling wax melts, it starts with the combinations of the essential oils. This is another area that is versatile and you have control over. So go wild! Here are some of my favorites that you can try for inspiration:
- Ylang Ylang and Wild Orange
- Lemon and Rosemary
- Lavender and Rose
- Peppermint, Rosemary, and Cinnamon
- Lavender, Cedarwood, Wild Orange, and Ylang Ylang
- Rosemary, Mint, and Lavender
- Cedarwood, Lavender
- Eucalyptus, Peppermint, and Myrrh
Those are just a few ideas that I think you are going to like. Feel free to make yours as strong or light smelling as you prefer.
How Do I Make These Homemade Wax Melts Stronger?
The only problem with making wax melts out of strictly coconut oil is that they melt rather quickly. Plus, they aren’t as hard as store-bought melts. After some experimenting, I found that you can mix the coconut oil with real beeswax in a double boiler. This allows them to set up a little better and makes them more solid. This is an idea if you are giving them away as gifts too.
Hi!
Ginny Collins is a passionate foodie and recipe creator of Savor and Savvy and Kitchenlaughter. Indoors she focuses on easy, quick recipes for busy families and kitchen basics. Outdoors, she focuses on backyard grilling and smoking to bring family and friends together. She is a lifelong learner who is always taking cooking classes on her travels overseas and stateside. Her work has been featured on MSN, Parade, Fox News, Yahoo, Cosmopolitan, Elle, and many local news outlets. She lives in Florida where you will find her outside on the water in her kayak, riding her bike on trails, and planning her next overseas adventure.

So,
Why are we adding coconut oil to the wax? Coconut oil would work as a carrier of the DO, but why do we need it?
And how do u find coconut oil without any smell? I am not a fan
Thank you!
Refined coconut oil is cheaper and has the scent removed.