Cleaning drip pans is a dreaded task for most cooks. Learn our easy method for how to clean stove drip pans naturally without harsh chemicals. Your stove’s burner pans will be looking great in no time.

When Your Electric Stove Burners are a Hot Mess
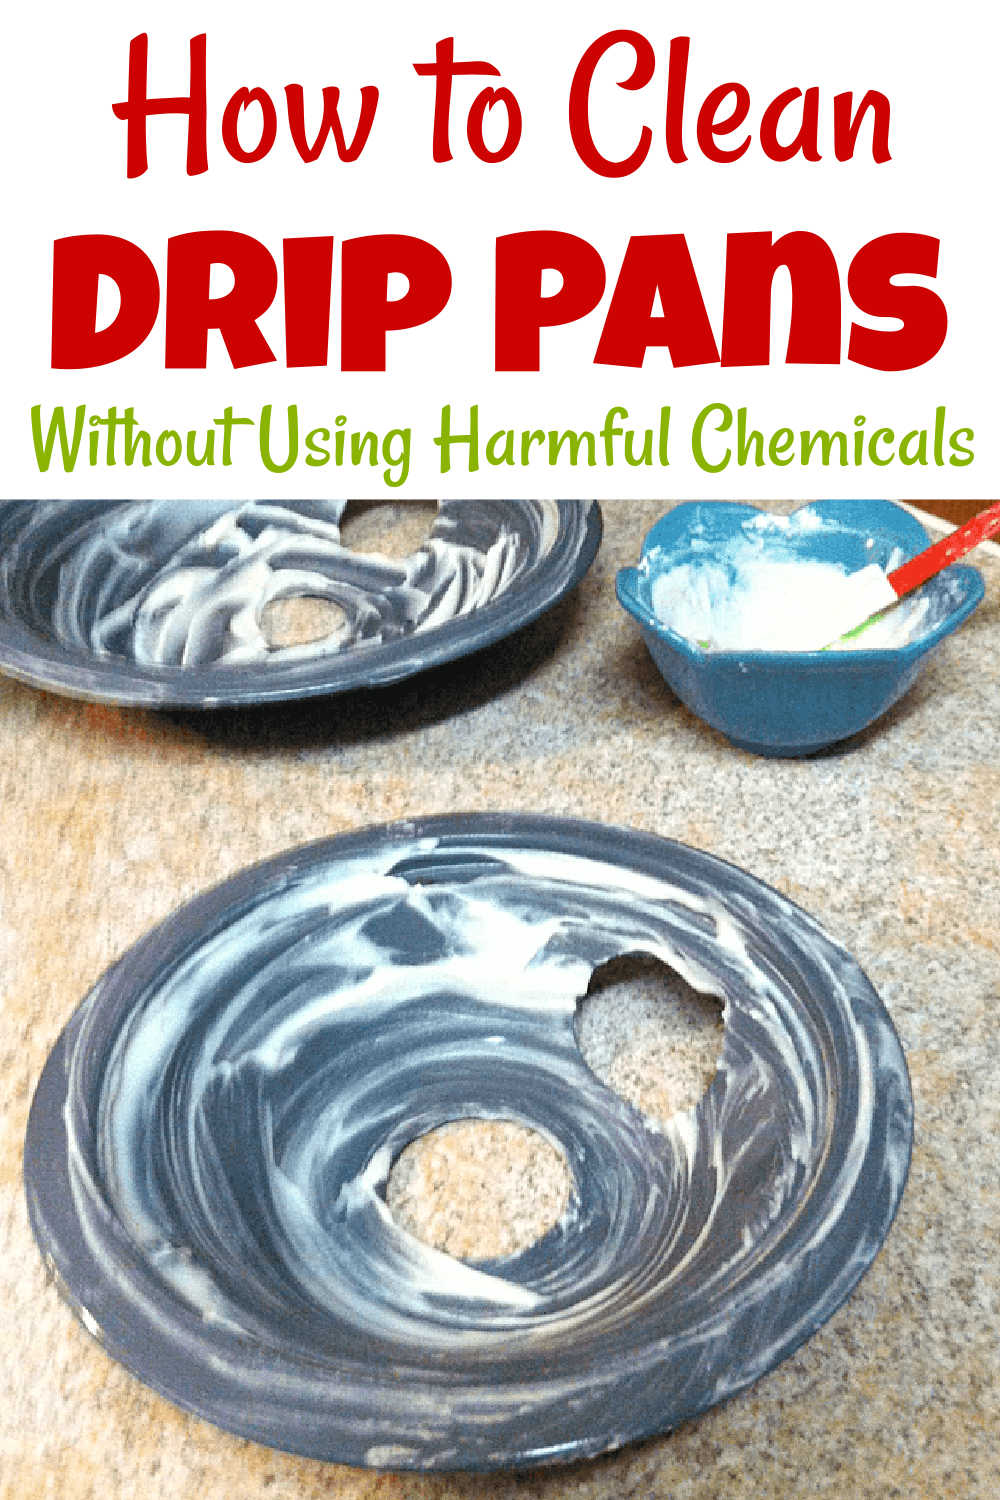
This isn’t a set-it-and-forget-it method of cleaning your electric stove drip pans![]() . It does require elbow grease. As you can see from the picture, I was working with some fairly messy stove burners. Roll your sleeves up and follow our step-by-step instructions for cleaning drip pans.
. It does require elbow grease. As you can see from the picture, I was working with some fairly messy stove burners. Roll your sleeves up and follow our step-by-step instructions for cleaning drip pans.


Supplies to Clean Stove Drip Pans
Baking Soda. This simple baking ingredient is one of the most powerful all-natural cleaning agents you will find. You can use it to make several different cleaning solutions for tasks just like this one.
Dish Soap. Gentle, basic dish soap is a wonderful cleaning solution for breaking up grease and loosening up gunk.
Scrubby Sponge. Or you can use a steel wool pad. I actually scrubbed with a crocheted dish scrubby. You will have way better results using the tough side of a regular dish sponge or maybe even steel wool.
Plastic Bags. I used old Ziplock bags, but you can use any kind of baggy or even plastic bags from the grocery store. Use what you have!
Optional Supplies for Messy Stovetop Burners
Vinegar. Sometimes a little extra oomph is needed for these hard-to-clean areas of our home. Vinegar works wonderfully as a pre-soak to clean stubborn messes. If our more mild and virtually smell-free method below doesn’t work, consider adding a vinegar soak to step two before moving on to the cleaning paste.
👩🍳 Instructions
Step One: Remove the burners themselves first. You may need to twist them out of the sockets. If you have different sizes of burners, make sure you pay attention to where each one belongs. Set these aside where they will not get wet.
Next, lift out those pesky drip pans and shake them into the sink or into a garbage bag to get rid of any loose gunk. This is the easy part! Use a stiff brush to loosen the gross stuff if needed.
Step Two: Spray down the stove drip pans. You’ll be surprised at just how much gunk a strong stream of water can remove on its own. It helps if your faucet has a powerful spray so you can blast the gunk away.
If the stuff caked on your drip pans is almost, but not quite loose after you spray it down, you might soak it for ten minutes or so just to make more headway before moving on to the next step.

🧽 Making the Homemade Cleaning Paste
Step Three: Combine dish soap and baking soda in a 1:1 ratio in a small bowl. Mix the ingredients for your homemade cleaning paste together until it creates a frosting-like consistency with a slightly foamy texture. Here’s what you should see when you have everything all mixed up.

Step Four: Apply the mixture to your drip pans. This is a great time to be generous. When I say generous, I mean slather it on. Don’t be shy about this.
Next, give it all a scrub down for a few seconds to loosen things up. Work the cleaning solution into all that grease really well.
I scrubbed for 30 seconds or so on the ones that were in especially bad shape. Don’t be afraid to use a stiff brush or scrubby sponge if you need to. And work those elbows.

⏳ Let the Stove Burners Soak
Step Five: Transfer the drip pans to Ziploc bags so they’re out of the way and aren’t messing up your counters. Let them sit for an hour or more soaking in the cleaning paste you made.

If you don’t want to waste the expensive Ziplock bags on this, just use the plastic bags from the grocery store. I had some Ziplocks I had used for freezing meals that would have been thrown out, so it made for an easy choice.
📍 While You Are At It – Clean Underneath the Stovetop
There’s no better time than now to lift up that “hood” and clean the area under your stovetop. You might have to fiddle with the release mechanism to figure out how to lift the stovetop up.
Sometimes they just lift straight up. Sometimes, the top might just be stuck from excess gunk so you have to pull hard or spray the crack with your favorite all-purpose cleaner and let it soak for a minute. Trust me, we’ve moved into more than one house where that was the case.
Sometimes, there is a release mechanism along the front lip of the stovetop, or along the edge of the part where the control panel is. Every brand is different so if you can’t figure it out a quick google search of your make and model instruction manual should help.
Most electric stovetops have some way to pull the cooktop up and get to the stuff that falls down in. Again, a little soap and water does the job just fine. No harsh chemicals are necessary.

🧽 Finish Cleaning Your Drip Pans
Step Six: Once you’ve waited at least thirty minutes, remove the soaking drip pans from those bags and scrub away. I didn’t get a picture of this step, but here’s the result.

I’m happy with the results. They aren’t in like-new condition but don’t you agree that the after looks much better than the before? Huge improvement in my eyes, and I didn’t have to use Ammonia and kill brain cells to clean my burner pans and make a tremendous improvement.
If you’re looking for an easy and natural method for cleaning your drip pans, I highly recommend you give this a try.
FAQ
How do I remove my drip pans?
First, you need to remove the burners themselves, which is usually just a matter of pulling the connection loose or possibly twisting the connection and then pulling. Place these on the side. At this point, you should be able to just lift your drip pans right out.
Depending on your oven model you may need to lift the stovetop cover to remove the drip pans. This is usually done by simply lifting straight up on the edges of the cooktop.
Can I put my drip pans in the dishwasher?
Yes! If your metal drip pans are only lightly soiled, throwing them in the dishwasher is an easy way to give them a quick touch-up and remove any fresh grease.
Can I clean my drip pans with ammonia?
Yes. Yes, you can. But you may also burn your nose hairs off — it’s a pretty dangerous chemical. I prefer to get my home mostly clean without dangerous chemicals over having a sparkly “clean” home that’s been doused in dangerous chemicals. That’s why I came up with this more natural method for cleaning drip pans with just dish soap and baking soda.
More Great Ideas for Cleaning
Ditch Paper and Switch to Re-usable Cleaning Cloths
Snag our Free Cleaning Schedule Printable
Grab our Free Spring Cleaning Checklist.
Hi!
Ginny Collins is a passionate foodie and recipe creator of Savor and Savvy and Kitchenlaughter. Indoors she focuses on easy, quick recipes for busy families and kitchen basics. Outdoors, she focuses on backyard grilling and smoking to bring family and friends together. She is a lifelong learner who is always taking cooking classes on her travels overseas and stateside. Her work has been featured on MSN, Parade, Fox News, Yahoo, Cosmopolitan, Elle, and many local news outlets. She lives in Florida where you will find her outside on the water in her kayak, riding her bike on trails, and planning her next overseas adventure.
Hello admin, i must say you have hi quality content here.
Your page should go viral. You need initial traffic boost only.
How to get it? Search for: Mertiso’s tips go viral
The SOS pads with the soap in them. I use to clean apartments after moveouts and wish I had thought of them. During one of my kitchen cleanups, a tenant had left two boxes under the sink. Decided to give them a try and was glad I did. This tenant would cook meat on the racks in the oven and had a cookie sheet thing on the bottom to catch most of the grease that would drip off. Gross.
Anyway, the SOS pads even cleaned what I thought was rust on the stovetop. Turns out it wasnt. Funny thing is it took every SOS pad he left to clean that place
Love SOS pads! They’re great for cleaning tough messes.
I do something similar. I just add a bit of vinegar before scrubbing. It really cuts down on the scrubbing. Just do it in you sink.
Oh good idea!
Oh my gosh, this does work but I guess I scrubbed too hard with a stiff toothbrush and there is a hole now a little smaller than a dime!!! Will that be dangerous to use? Do I have to buy a new one after all my scrubbing?
Ah that totally sucks, I’m sorry! 🙁 I’m honestly not sure if it’s ok to use, so I’d probably play it safe just to stay on the safe side.
I appreciate all that was written here about how to clean drip pans that catch grease from going down your pipes. My family loves to cook with grease and oils and so we always have to make sure that we dispose of them correctly. They always make a mess in the kitchen and so we will double check and make sure that we are cleaning them properly! Thanks again!
I haven’t seen the word “slathered” for years. I’m an old Kentucky boy (83) and intend to ‘slather’my drip pans as soon as I finish this.
I found this on Pinterest too! Worked like a CHARM. Thank you!!
I noticed I got a rash on the skin the was exposed to the pasty solution…I’m assuming the mix of baking soda and dish soap I used (Honest Company) is what caused the reaction. Baking soda is more powerful than I thought!
Thanks for your ideas!
I’m glad it worked for you, but so sorry you experienced a bad skin reaction!
How do you clean the burners? When I turn on mine they burn off whatever was spilled on them.
Thanks
I found this on pinterest. I cannot thank you enough. I’ve been wanting to know how to do this, but I couldn’t think of the words “drip pans” to ask someone. Thank you very much.
Can I use baking powder instead of baking soda?
Thanks.
once you get them clean, cover them in foil. that way when they get dirty again you can just take the foil off, and replace. no cleaning.
Good idea!
I found your article and I’m doing it RIGHT now! I’m actually using what’s leftover from my mixture to clean other areas of my kitchen, haha. Thanks for the “recipe!” Have a blessed week. 😀
Haha Yay for double duty cleaning!! Enjoy, Carly! 😀
Thank you 🙂 This is Def a game changer !
🙂
you are amazing! I’m about to go try this myself. thanks!
OH!…I can’t believe I JUST spent 2 hours cleaning my stove today, and it STILL looks horrible! I can NOT believe I ran into this article THIS EVENING! TOO FUNNY! I am totally planning on starting completely over this weekend using YOUR method! I think my stove looks WORSE than yours…no doubt in my mind! Any ideas how to get rid of that built up rusty looking ring around the white part the metal rings on the white surface of the stove top? I have a REALLY old model of an electric stove. It looks like a combination of built up grease and some rusty gunky colored stuff…lol…I don’t even KNOW! All I know is I scrubbed, used cleaners and it STILL won’t come off! Any ideas would be appreciated! I will try your mixture on there as well and see if it helps!
That has happened to me as well, Mindy!! While my method did require some scrubbing, I’m okay with a little elbow grease if it gets the desired results. I hope it worked out well for you if you’ve tried it already!