Oh my, if you want to wow your Easter guests, this Spring/Easter Cadbury No Bake Cheesecake to choose. It’s easy to make, really delicious, and everyone is going to love it. It is so colorful, and just as much fun to serve and eat.
🍽️ Why This Recipe Works
Easy, easy, easy – This recipe is super easy to make and you never have to turn on the oven, yet it is so impressive looking that you are going to be shocked how much fun it is.
No Bake – A big advantage to this recipe is that it is “no bake.” There are times, especially in the summer or when you are short on time, where these recipes are perfect. We all love easy desserts that require no cooking like the No Bake Cheery Cheesecake, No Bake Lemon Strawberry Dream Bars, No Bake Lemon Blueberry Cheesecake or No Bake Strawberry Icebox Cake.
Make Ahead – Make this one ahead of time and leave it in the freezer. So a couple weeks BEFORE EASTER, you can make it at your convenience.
Forgiving – What I mean by that is that you can engage the kiddos for this one and it won’t matter if there is a little extra here and there. If it’s a little messy on the Copper Mats, it won’t matter. This recipe is meant for them!

🍓 Ingredients
One taste and you’ll be head over heels in love with this recipe. Now let’s get down to business so you can head into the kitchen and throw it together.
Cream Cheese: As with almost any cheesecake, cream cheese is the main ingredient. You will need 32 ounces, and it will be purely blissful when you bite into it. Start off with softened cream cheese for best results. If you haven’t made your own before, try making the Instant Pot Cream Cheese for an incredible homemade version.
Cheesecake Flavored Pudding Mix: You will get so much amazing flavor from using a cheesecake flavored pudding mix. Any brand will work great!
Cadbury Mini Eggs: Because this cake is for Easter, it makes sense to add mini eggs to it! However, you can easily swap them out with other candy to make different holiday or occasion themes. Go wild!
Buttercream Frosting: I used store-bought buttercream, but you could also make your own homemade version. Whatever works for you should be great!
🥘 What are Copper Cooking Mats?
I can’t wait to introduce you guys to these sweet cooking mats. They will seriously change the way you cook! We use these out on our grill with such great results that we really need to feature more recipes to show them off.
The outside of the box might read “Grilling Mats,” but they work great indoors too. They were designed for non-stick options for outdoor grilling enthusiasts. It virtually eliminates sticking and scraping food off of the grill plate. Since they are non stick, your food simply slides off. They are similar to Silpats, but a lot less expensive and more versatile. You can move these from the oven to the dishwasher to the grill all in one weekend with no worries at all!
For this project, we got a little fancy and decided to cut up the copper cooking mats to make the cylinders. I love projects that look HARD, but are really super simple! 😊
Yes, you can cut these mats and have no worries about shards of metal piercing through. I only say that because I was thinking the same thing as you at one point. Think about these more like cutting a silicone mat. It is easy, smooth and you are not going to be left with any residue at all.
🍴How to Prepare The Copper Mats
There are a few extra steps in here because I want to make sure you get the full detail of making the cylinders for success! Don’t let this deter you! These are super simple to make and I want to make sure everyone is successful!

Step One: Measure the Copper mats, and cut them in three inch strips. Fold the strips to meet ends, until you have about a three inch, in diameter circle. Cut the strip where needed, and leave enough extra to tape the ends of the strip together. Tape the ends of the strip with duct tape, and make sure it’s taped securely along the edges. This is going to hold it together really well as the no bake cheesecake is thick and delicious!
Step Two: Place the copper circles on a parchment lined cookie sheet. This will make it easier to clean up!
When you cut the copper mats to form the rings, you may have a few smaller pieces that you’ll need to tape together to make another circle. Let’s not waste any of it, okay?
🍽️ What Is A Copper Mat Substitute
If you have Pastry molds, or stainless steel plating rings, you can use those instead of cutting and taping copper mats.
🍽️ Instructions

Step One: Mix the Graham Cracker crumbs, melted butter and sugar together in a bowl, and place an equal amount inside each copper mat circle. Tap the crumbs down with the end of a wooden spoon, until they’re even and compaced. Place in the freezer.
TIP: Another option is to use the back of gravy ladle or big soup spoon. They have a great rounded surface to make this smooth and compact as well.
Step Two: In the bowl of a stand mixer, mix the softened cream cheese until smooth and creamy. Stop the mixer and scrape down the bowl. Mix again. Add the vanilla and lemon juice, and continue mixing.
Step Three: In a separate bowl, add half of the three ounce package of instant cheesecake flavored pudding and ½ a cup of half n half. Mix with a whisk until the pudding is smooth. Add the additional two tablespoons of half n half as needed, to make the pudding smooth. When pudding is smooth and thick, add it to the mixing bowl, and blend until completely smooth with the cream cheese.
TIP: The Instant Cheesecake Flavored Pudding is located by the other pudding packs in your grocery store. You are looking for a plain one. If you don’t find it, a plain one or even a vanilla flavored will work as a substitute.
Step Four: Add the powdered sugar a little at a time, and blend well after each addition. Scrape down the mixing bowl, and blend again.
Step Five: Divide the cheesecake batter evenly between four small bowls.
- In one bowl, add a drop of Aqua food coloring gel, and stir.
- For the next bowl, add a drop of pink food coloring gel, and stir.
- In the next bowl, add a drop of Neon lime green food coloring gel, and stir (You may need to add another drop of the lime green to get the color in the photo.)
- For the last bowl, add a drop of purple food coloring gel, and stir. Depending on what brand of food coloring gel you use, you may need to add a little more or less than one full drop to achieve the pastel color desired.
TIP: We used Great Value food coloring Gel from Walmart. You can use store brands with no issues with quality here.
Step Six: Remove the Graham cracker crumbs from the freezer, and add an equal amount of the Aqua colored cheesecake on top of the Graham cracker crumbs, and place back in the freezer.
You’ll want to spend the time and freeze for 30 minutes in between the layers. That way, you will get those gorgeous, smooth layers.
Wait 30 minutes, and take the cheesecakes out of the freezer, and add an equal amount of Pink cheesecake on top of the Aqua. Place the cheesecakes back in the freezer for 30 minutes.
Take them out and add an equal amount of the Lime green cheesecake on top of the Pink. Place the cheesecakes back in the freezer.
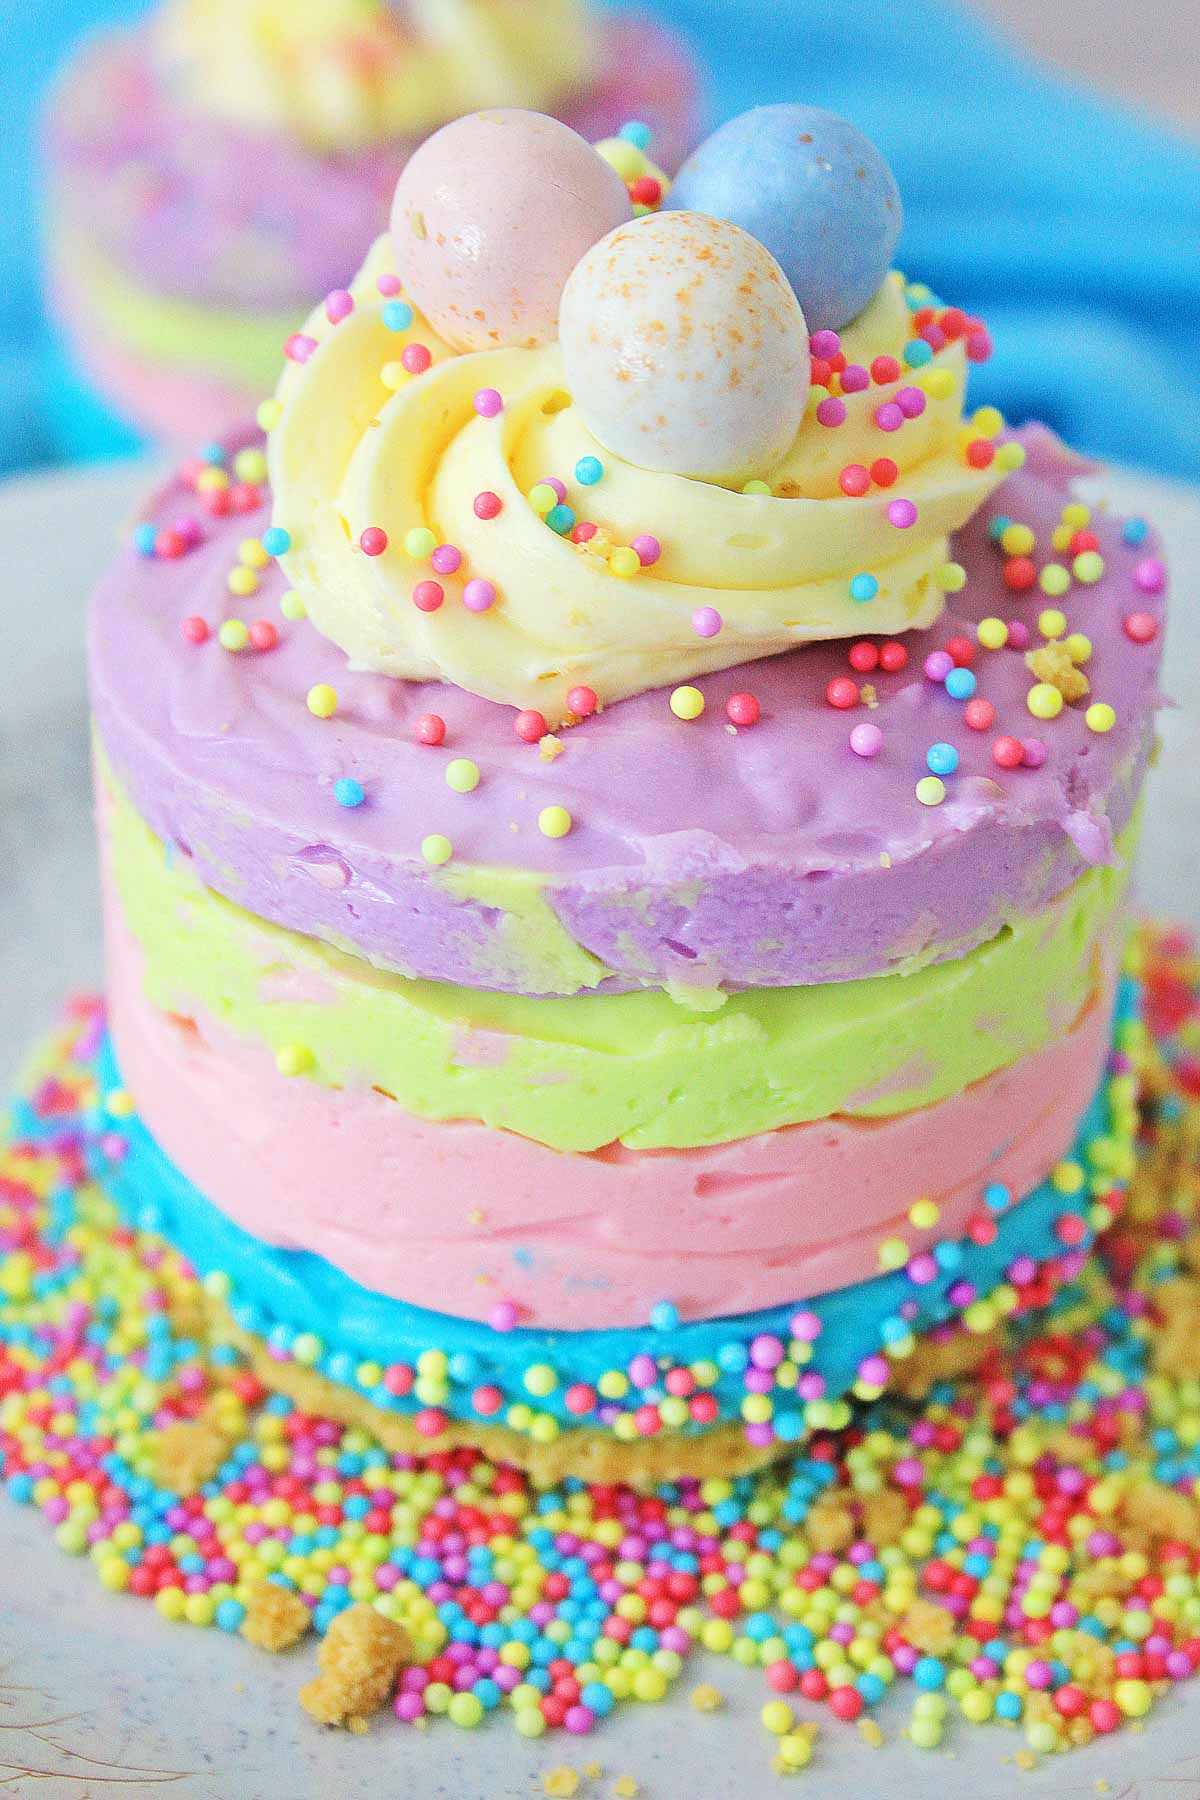
After 30 minutes, remove them, and add the Purple cheesecake on top of the Lime green in equal amounts. Smooth the tops, and place back in the freezer until time to serve.
TIP: When adding the different colors of cheesecake to the copper circles, smooth the cheesecake batter out as much as possible to the edge of the circle so that you have smooth layers when the copper circles are removed. Try to do a little tap of the cheesecakes on the counter to get the cheesecake mixture to settle in nicely so you won’t have pockets of air. Just take the sheet pan and gently tap the entire thing on the counter a few times. The filling will spread slightly and even out nicely.
Step Seven: When ready to serve, remove the tape from the copper circles, and remove them from the cheesecakes, leaving the cheesecakes on the parchment lined cookie sheet. Add a swirl of frosting on top of the cheesecakes, and sprinkle with the Easter Nonpareils. Place three of the Cadbury mini eggs on the Frosting. Serve and Enjoy!

Recipe FAQ
Absolutely! Especially during holiday times, you will want any recipe that will allow you to prepare early so you can enjoy time with your family and guests.
Prepare these cheesecakes all the way up until the end, remove the copper circles, and decorate the cheesecakes. Simply place them back in the freezer until it’s time to serve. I like to take mine out the morning when I plan to serve them and place them in the refrigerator. They will be delicious and you will have no stress.
If you have Pastry molds, or stainless steel plating rings, you can use those instead of cutting and taping copper mats.
🍋 Meal Prep Instructions
This, like most of our recipes, can be meal prep friendly! Here’s tips and tricks to make that happen!
- Make the cheesecake ahead of time and place in the refrigerator, covered until ready to use. Take out 15 minutes prior to using it so it is easier to work with. You can do this before or after you have added in the coloring. Just make sure you keep it well covered so it doesn’t get any refrigerator smell.
- Make the copper rings early and set them aside.
- Use the freezer friendly instructions above and freeze the layers. Add the buttercream frosting just before serving.
Using any of these meal prep options will help you have a smooth and easy holiday weekend!
🥄 Related Recipes


Tried this recipe? Please leave a star ⭐️⭐️⭐️⭐️⭐️ rating in the recipe card below and/or a review in the comments section further down the page. You can also stay in touch with me through social media by following me on Instagram, Pinterest, and Facebook!

Cadbury No Bake Mini Cheesecake
Equipment
- Copper Mat
- Pastry Bag
- Stand Mixer
Ingredients
Crust
- 1 sleeve Graham Crackers crushed in the blender
- ½ stick Butter melted
- 1 tbsp Sugar heaping
Cheesecake
- 32 oz Cream Cheese softened
- 1 cup Powdered Sugar
- 1 tbsp Vanilla
- 1 tsp Lemon Juice
- 1.5 oz Cheesecake Flavored Instant Pudding Mix this is ½ of a box
- ½ cup Half and Half
- 2 tbsp Half and Half used separately
Decorate the Top
- 1 can Buttercream Frosting
- 1 package Cadbury Mini Eggs
- Easter Nonpareils
Instructions
Prepare the Copper Mats
- Measure the Copper mats, and cut them in 3 inch high strips. Fold the strips to meet ends, until you have about a 3 inch, in diameter (across) circle. Cut the strip where needed, and leave enough extra to tape the ends of the strip together. Tape the ends of the strip with duct tape, and make sure it's taped securely along the edges. Place the copper circles on a piece of parchment paper, on a cookie sheet.
- Mix the Graham cracker crumbs, melted butter and sugar together in a separate bowl, and place an equal amount in each copper circle. Tap the crumbs down with the end of a wooden spoon, until they're even and compact in the bottom of the copper circle. Place in the freezer.
Prepare the Cheesecake
- In the mixing bowl of a stand mixer, mix the softened cream cheese until smooth and creamy. Stop the mixer and scrape down the bowl, and mix again. Add the Vanilla, and lemon juice, and mix.
- In a separate bowl, add half of the 3 ounce package of Instant cheesecake flavored pudding, and 1/2 a cup of half n half, and mix with a whisk until the pudding is smooth, and no longer grainy. Add the additional 2 Tablespoons as needed, to make the pudding smooth. When pudding is smooth and thick, add it to the mixing bowl, and blend until completely smooth with the cream cheese. Add the powdered sugar a little at a time, and blend well after each addition. Scrape down the mixing bowl, and blend again. Divide the cheesecake batter evenly between 4 small bowls.
- In one bowl, add a drop of Aqua food coloring gel, and stir. In the next bowl, add a drop of pink food coloring gel, and stir. In the next bowl, add a drop of Neon lime green food coloring gel, and stir – you may need to add another drop of the lime green to get the color in the photo. In the last bowl, add a drop of purple food coloring gel, and stir. Depending on what brand of food coloring gel you use, you may need to add a little more or less than one full drop to achieve the pastel color desired.
- Remove the Graham cracker crumbs from the freezer, and add an equal amount of the Aqua colored cheesecake on top of the Graham cracker crumbs, and place back in the freezer. Wait 30 minutes, and take the cheesecakes out of the freezer, and add an equal amount of Pink cheesecake on top of the Aqua. Place the cheesecakes back in the freezer for 30 minutes, and then take them out and add an equal amount of the Lime green cheesecake on top of the Pink. Place the cheesecakes back in the freezer, and after 30 minutes, remove them, and add the Purple cheesecake on top of the Lime green cheesecake in equal amounts. Smooth the tops, and place back in the freezer until time to serve.
- When ready to serve, remove the tape from the copper circles, and remove the copper circles from the cheesecakes, leaving the cheesecakes on the parchment lined cookie sheet.
- Add a swirl of Frosting on top of the cheesecakes, and sprinkle with the Easter Nonpareils. Place three of the mini eggs on the Frosting. Serve and Enjoy!
Notes
- Make the cheesecake ahead of time and place in the refrigerator, covered until ready to use. Take out 15 minutes prior to using it so it is easier to work with. You can do this before or after you have added in the coloring. Just make sure you keep it well covered so it doesn’t get any refrigerator smell.
- Make the copper rings early and set them aside.
- Use the freezer friendly instructions above and freeze the layers. Add the buttercream frosting just before serving.
Nutrition
Hi!
Ginny Collins is a passionate foodie and recipe creator of Savor and Savvy and Kitchenlaughter. Indoors she focuses on easy, quick recipes for busy families and kitchen basics. Outdoors, she focuses on backyard grilling and smoking to bring family and friends together. She is a lifelong learner who is always taking cooking classes on her travels overseas and stateside. Her work has been featured on MSN, Parade, Fox News, Yahoo, Cosmopolitan, Elle, and many local news outlets. She lives in Florida where you will find her outside on the water in her kayak, riding her bike on trails, and planning her next overseas adventure.

How fun for Easter!!! this was a crowd pleaser